Previously we've only played the timeline using the Timeline Bar's Play button to preview it in the editor. If you preview the project, nothing happens. This is because we need to add an event to play the timeline.
From here on we're done editing the timeline, so turn off editing mode by clicking the pencil toolbar button again. This restores normal use of the Layout View.
add the Timeline Controller object
To control timelines we need the Timeline Controller object to be added to the project. This provides conditions, actions and expressions relating to timelines in the event sheet.
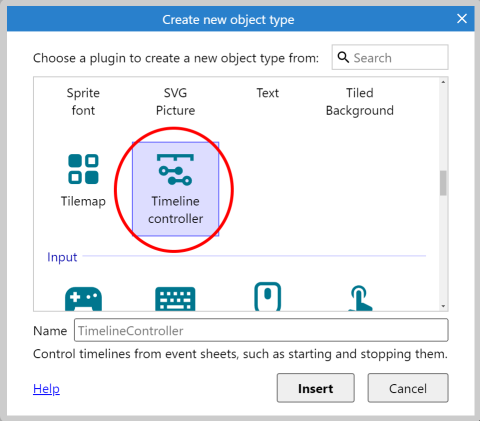
In Construct Animate the Timeline Controller object is already added for new projects. In this case you should already be able to see it in the Object types folder in the Project Bar. However if you're using Construct 3, or it's otherwise not there: as with adding any other object, double-click a space in the Layout View to add a new object, and choose the Timeline Controller object.
 Adding the Timeline Controller object, if it is not already in the project.
 play the timeline on startup
Now switch to the event sheet. Add an On start of layout event via the System object.
In this event, add an action, and choose the Timeline object. Choose the Play action. The timeline you have is the only one in the project, so it should already be selected. The tags are optional and can be left empty. (Tags allow control of playbacks as they're playing, similar to tags in the Audio object.)
You should now have an event that plays the timeline when the layout starts!
preview the project
Now preview the project itself, instead of in the Timeline Bar. You should see your timeline play at runtime!
Using the other features of the Timeline Controller object, you can do things like activate timelines at certain points in the game, pause and resume them, adjust the playback time and speed, and so on.
A handy shortcut
A quicker way to get timelines to play in preview is to select the timeline in the Properties Bar, and set the Start on layout property to the layout you want it to play for. However this guide showed you how to use the Timeline Controller object as it allows full control of playback, such as starting playback in response to user input, pausing/resuming playback, setting the time, and so on.
More timeline features
Some other useful features of timelines include:
- Setting tags on master keyframes in the Timeline Bar. These then trigger On keyframe reached in the Timeline object. This lets you synchronize actions and other events with playback of the timeline.
- Set the timeline Path mode to Cubic Bezier and you can use curved paths for the position (X and Y) tracks.
- Change Result mode to Relative and the timeline will play from the starting values of the object. This is useful for making an object follow a timeline movement from its starting position, instead of using the fixed positions as seen in the Layout View.
- Use the Move To behavior to move along a timeline. This uses a maximum speed, acceleration and deceleration, and optionally includes turns. Normally timelines work over fixed time intervals, but this approach lets the object move at a fixed speed instead, which can result in a more natural movement. See the Move along path example for a demonstration.
- Add audio tracks to schedule audio playback with timelines.
- Add value tracks to help control any other parameter, such as the volume of the audio track.
- Use nested timelines, so you can re-use a timeline within another timeline.
Conclusion
Timelines are a powerful feature of Construct with lots of uses! They could be used for animations, cut-scenes, animations during gameplay, or just to design a path for an object with the Move To behavior to follow. This tutorial has just scratched the surface - hopefully you can see the potential and will find lots of interesting and creative ways they can be combined with your projects!
Further reading
For more information, see the manual sections on the Timeline Bar, Timelines and the Timeline Controller plugin.